
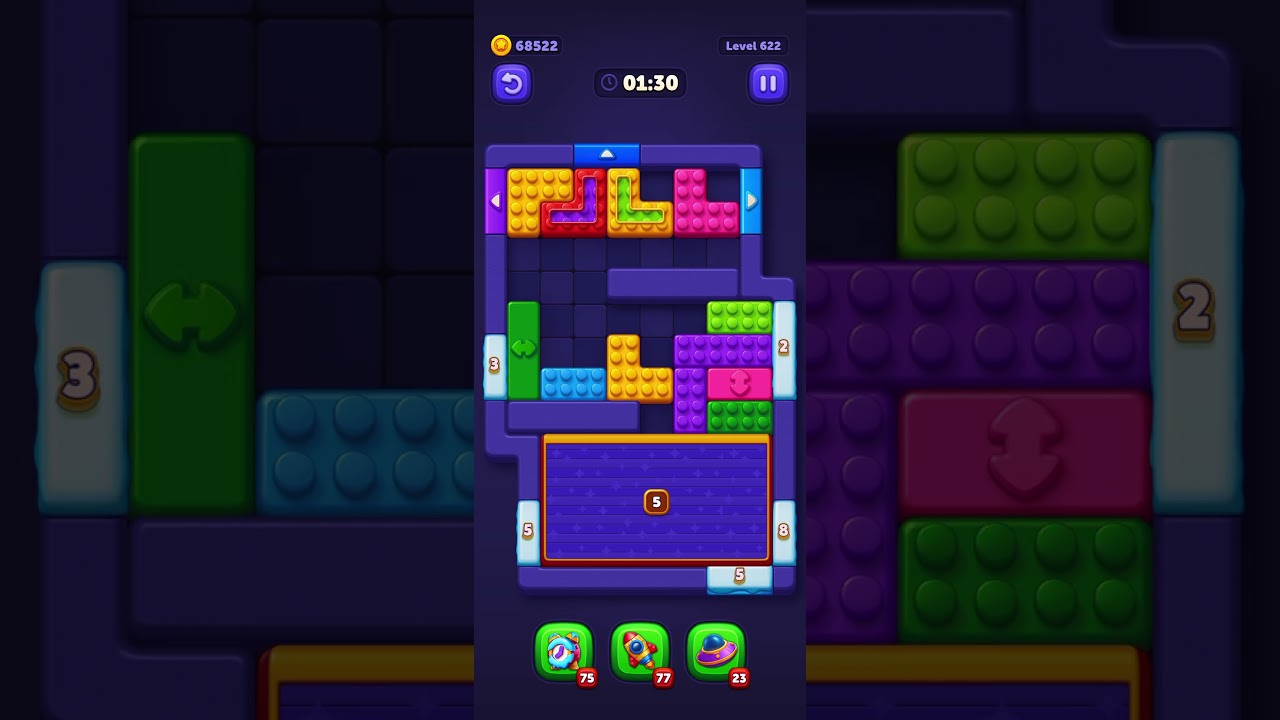
To beat Level 622 in Block Out, dismantle the tall central column bottleneck first, route direct surface matches immediately, and preserve at least three empty slots in your holding dock. Only move a blocking piece into the tray if it immediately exposes a tile needed by an active gate. Never park unneeded orphan colors in the dock without an exit path, as running out of buffer space will trigger an unrecoverable deadlock.
Board Layout and the Central Bottleneck
Level 622 arranges colored tiles in deep, multi-tiered vertical stacks. The primary obstacle is the central column, which locks away essential colors required by active target gates beneath mismatched foreground tiles.
Tapping outer tiles indiscriminately leaves the central stack trapped while scattering unaligned colors across your board. Before tapping your first piece, trace the vertical color order of each lane. Identify which lanes feed active target gates immediately and calculate the exact moves required to expose the matching tiles locked inside the central stack.
Move Priority and Tray Buffer Management
Maintaining at least three open slots in your holding dock is necessary to survive mid-stage transitions. The holding dock is temporary staging space, not storage. If you fill dock slots with mismatched orphan colors, you lose the maneuvering room required to dig into deep stacks.
Evaluate every potential move by its net impact on your buffer capacity:
| Move Type | Player Action | Board Impact | Risk Level |
|---|---|---|---|
| Direct Gate Route | Tap block matching an open gate | Clears immediately without using dock space | Low |
| Unmasking Shift | Move blocker into holding dock | Exposes hidden block needed for an active gate | Medium |
| Speculative Shift | Move unneeded block into holding dock | Fills buffer slot without a guaranteed match | High (Avoid) |
| Multi-Match Burst | Route sequential matching colors | Clears buffer slots rapidly and unlocks lane depth | Optimal |
Only shift a blocker into the dock if the piece directly behind it clears into a gate or matches a tile already in your tray. If a move merely reveals another obstacle, leave it alone until an exit route opens.
Three-Phase Step-by-Step Clearing Sequence
Work from the center outward to create the lateral room needed to clear outer lanes:
- Phase 1: Direct Clearance and Perimeter Opening. Tap visible surface blocks that match active gates. Route these pieces directly to collection points without touching the holding dock.
- Phase 2: Center-Column Unlocking. Target the tall middle stack. Move the top blocker into the holding dock only when it reveals a color required by an active gate, then route that revealed piece immediately to reclaim your empty slot.
- Phase 3: Side-Lane Consolidation and Final Cleanout. Once the center column is dismantled, clear the remaining side lanes. Pair matching colors into open gates and clear residual blocks in descending order of stack height.
Preventing Tray Deadlocks
Prematurely filling the dock with mismatched orphan blocks causes most failures on Level 622. Spreading single red, blue, green, and yellow tiles across separate tray slots freezes the board because gates require full sets to clear.
Always monitor your open slot count before tapping. If your tray drops to only two open slots without a guaranteed match, stop unstacking new lanes. Scan the board for an exposed tile that matches a block already sitting in the dock, and route it immediately to restore buffer capacity before taking any other action.
Free Block Out Codes
Current active codes and how to redeem them.

James Brown
James focuses on Android gaming on PC, emulator setup, controls, performance tuning, and practical troubleshooting for longer play sessions.
COMMUNITY
Player Comments
33 players commented on this guide.
This guide answered the exact question I had.
Can you add more details about strategy in a future update?
I tried this today and it worked better than my old setup.
I wish I had read this before upgrading the wrong thing.