
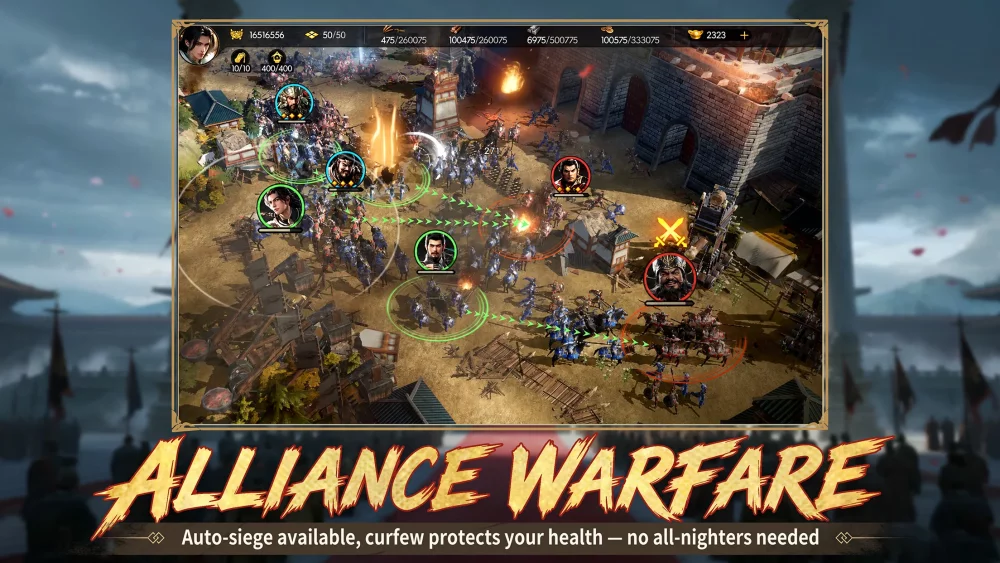
Capturing Level 9 cities like Ye City in Conquest of Nine Kingdoms is the ultimate test of an alliance leader’s strategic vision and tactical execution. Because these high-tier fortifications possess massive defensive stats and rapid regeneration, no single alliance can reliably conquer them without suffering unsustainable losses. Success requires a orchestrated, multi-faction effort—a "four-alliance encirclement"—that balances synchronized troop movement with disciplined frontline rotations.
This guide details the mechanics of high-stakes sieges, providing the blueprint for coordinating massive player armies to overwhelm even the most resilient defenses.
The Mechanics of Synchronized Mobilization
The primary goal in any Level 9 siege is to maintain a constant damage-per-second (DPS) threshold that exceeds the city’s health regeneration rate. When dealing with a target as formidable as Ye City, the "stall" is your greatest enemy.
To prevent this, you must treat the four participating alliances as a single, modular army. Coordination begins with a centralized communication hub, typically via Discord, where real-time battle data is relayed to sub-commanders.
- The Striking Force: Designate one alliance as the "Breaker" (high-damage units) to target the guard-clearing phase, while the remaining three act as "Sustainers" (durable infantry) to occupy the gates and absorb defensive counter-attacks.
- The Timeline: Establish a strict "Time to Objective" (TTO) for all participant groups. If one alliance arrives too early, they waste stamina; if they arrive too late, the initial wave is wiped out, and the city’s health resets.
Mastering Frontline Rotation Tactics
Frontline burnout is the most common cause of failure in Conquest of Nine Kingdoms. When your units engage a city gate, their durability and morale plummet. If you let your frontline units stay until they are fully defeated, you lose valuable time during the "retreat and reinforce" cycle.
Instead, implement a Relay System:
- Wave A (The Vanguard): Commits to the gate for a predetermined window (e.g., 10 minutes) or until their durability reaches 40%.
- Wave B (The Relief): Moves into position before Wave A fully retreats. This ensures there is never a "blank" period where the city can regenerate health.
- The Rear Buffer: Keep support units and logistics accounts at least two tiles back from the active gate. This prevents traffic jams and ensures that reinforcements have a clear path to the frontline.
Diplomatic Aggro and Territory Control
Managing the map during a massive siege is as much a political challenge as a military one. Because you are mobilizing four alliances, your territorial footprint is enormous, which may inadvertently trigger "aggro" from neighboring factions.
- Boundary Management: Before the siege begins, define clear "March Zones." If Alliance A’s troops overlap with Alliance B’s path, the AI movement logic can cause units to stutter or take inefficient routes.
- Perimeter Screening: While your main force focuses on Ye City, you must leave a "watchdog" contingent of players behind. A rival faction will almost certainly attempt to snipe your reinforcements or strike your undefended home bases. Assign a dedicated security officer to monitor the map periphery for hostile red markers.
Optimizing Squad Composition for Siege Warfare
Standard open-field PvP builds are often suboptimal for city sieges. Because city guards have high natural resistance, you must prioritize "Siege-Heavy" compositions.
The "Siege-Ready" Checklist:
- Durability Over Speed: Avoid pure cavalry compositions. While fast, they lack the sustainability to survive prolonged gate encounters. Focus on Shield-Infantry to soak up defensive damage.
- The Healer/Mitigation Rule: Every squad should include at least one hero with healing or damage-mitigation skills. This extends your "uptime" on the gate, meaning fewer trips back to the home base for repairs.
- Whale Allocation: Position your highest-stat "whale" accounts in the first wave. Their goal is to clear the initial guard waves as quickly as possible, creating a window for mid-tier players to provide the sustained volume of fire needed to deplete the city’s massive HP pool.
Troubleshooting: How to Break a Siege Stall
Even with perfect coordination, you may encounter a stall where the city health bar stops moving. This happens when the cumulative DPS of your four alliances drops below the city’s structural regeneration rate.
The "Total Push" Protocol: When a stall occurs, the leader must issue a "Total Push" command. This overrides standard rotation protocols and requires all four alliances to commit their entire reserve pools simultaneously. While this results in high troop casualties, it is the only way to burst through the final 10% of a high-tier city’s health.
Strategic Review: If you fail to capture the city, do not just blame the damage output. Check the following:
- Hero Kits: Are your players running heroes with "Fortification Piercing" or "Siege Buff" abilities? If not, they are effectively fighting with a penalty.
- Stamina Efficiency: Did your players reach the gate with low stamina? Ensure all participants are fully rested and have their stamina pools topped off before the siege clock starts.
- Command Post Location: Is your temporary encampment as close as possible to the gate? Even a one-tile reduction in travel distance can save thousands of seconds over the course of a multi-hour siege.
By synchronizing your four-alliance force, maintaining a strict relay rotation, and optimizing your squads for endurance, you can successfully conquer the most difficult objectives in Conquest of Nine Kingdoms. Discipline, not just raw power, is the hallmark of a champion alliance.
Free Conquest of Nine Kingdoms Codes
Current active codes and how to redeem them.

Sarah Williams
Sarah specializes in RPG and collection games, explaining team building, character growth, and beginner-friendly ways to avoid expensive early mistakes.
COMMUNITY
Player Comments
123 players commented on this guide.
I tried this today and it worked better than my old setup.
Nice guide. I am checking the other Conquest of Nine Kingdoms articles next.
This guide answered the exact question I had.
This saved me time in the early game.