
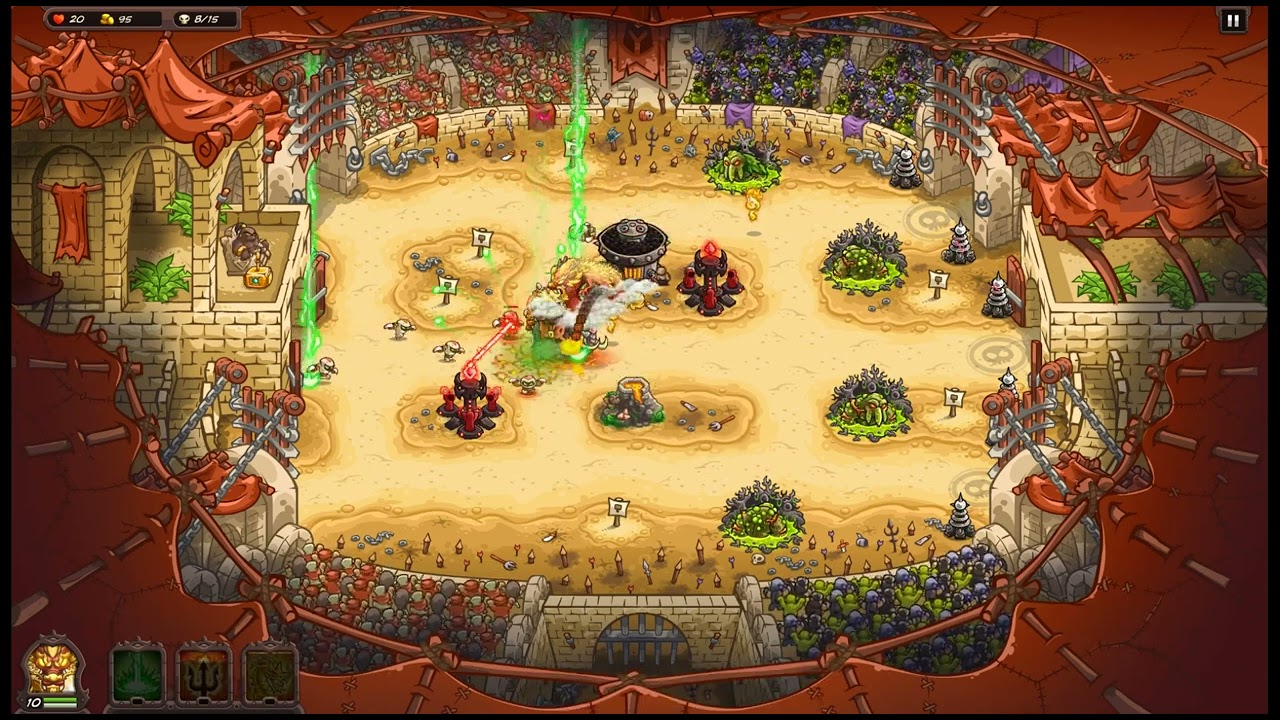
To beat the Grand Coliseum on Impossible difficulty in Kingdom Rush Vengeance TD+, concentrate your defense at the central intersection where the entry lanes merge before the exit gate. Enemy waves combine heavily armored gladiators, rapid skirmishers, and high-health warbeasts. Surviving requires durable melee blockers to hold the chokepoint, supported by area-of-effect artillery and single-target magical piercing to melt high-armor threats before your frontline collapses.
Recommended Tower Roles and Loadout
Success on Impossible difficulty requires a tower setup that answers high-armor bruisers, swift swarms, and high-health targets without wasting early gold across the perimeter.
- Frontline Stalling (Dark Knights or Orc Warriors Den): High-durability blocking units with heavy armor or revival mechanics keep incoming crowds held within your kill zones.
- Magical Piercing (Specters Mausoleum or Blazing Gem): The Blazing Gem provides ramping damage against solo armored heavyweights, while the Specters Mausoleum provides burst magic damage and spectral stalling units.
- Primary Artillery (Ignis Altar or Goblin Rocket Riders): Delivers area-of-effect blast damage to eliminate swarms before they overwhelm your blockers.
- Utility and Slows (Bone Flingers or Deep Devil's Reef): Inexpensive support towers that spawn cheap stalling units (such as skeletons) or apply slows to delay approaching waves.
Spend early gold on vertical upgrades. Raising a central chokepoint tower to Tier 3 or Tier 4 establishes far more lane stability than spreading low-tier towers across outer build pads.
Chokepoint Placement Strategy
The Grand Coliseum routes enemies along curved pathways that funnel into a single central gauntlet before the exit. Invest your gold directly around this primary convergence zone.
- Anchor the Central Junction: Place your primary barracks or Dark Knight sanctuary on the interior pads of the central junction. This allows your garrison to engage enemies arriving from both lanes without pulling your blockers out of range of your main damage towers.
- Maximize Attack Arcs: Position high-damage towers, such as the Blazing Gem or an upgraded mage tower, along the inward curve of the central bend so their attack ranges sweep approaching lanes before melee contact.
- Clip Path Bends with Artillery: Position your artillery where splash radiuses cover both converging lanes simultaneously.
- Stagger Outer Lanes with Support: Place baseline, low-investment support towers (such as Bone Flingers) on outer spawn paths. These distract and slow advance scouts, staggering wave arrival times so both lanes do not flood the main chokepoint at the same moment.
Enemy Threat Priorities and Counters
The Grand Coliseum fields distinct threat profiles that punish unbalanced defenses. Match each enemy type to its specific counter:
| Threat Type | Primary Danger | Tactical Counter |
|---|---|---|
| Armored Brawlers | High physical armor; quickly overwhelms standard melee units | Focus down with Blazing Gem beam or Specters Mausoleum possession |
| Arena Skirmishers | High sprint speed; slips past active melee engagements | Slow with Bone Flingers skeleton clutter and clear with Soul Impact bursts |
| Beast Handlers & Warbeasts | High health pools and heavy cleave damage | Kite with hero abilities while holding them inside artillery kill zones |
When heavily armored brawlers enter the gauntlet, manually retarget single-target magic towers onto them. Eliminating high-armor champions quickly frees your blockers to intercept trailing skirmishers before they run past.
Hero Positioning and Reinforcement Micro
Passive hero usage on Impossible difficulty leads to leaked units. Reposition your hero and cast spells actively throughout each wave:
- Position Behind the Primary Rally Point: Station your hero slightly behind your main barracks blockers during standard waves. This avoids initial vanguard burst damage while keeping hero abilities centered on the kill zone.
- Body-Block Leakers Downstream: If an elite enemy breaks through the primary line, immediately move your hero downstream toward the exit gate to stall the runner while ranged towers finish the kill.
- Cast Reinforcements Behind the Frontline: Deploy Reinforcements on cooldown, but always place them behind your primary defenders. Spawning militia directly into heavy enemy clusters causes them to die instantly to cleave attacks, whereas dropping them behind your main line creates a reliable safety net for leakers.
Ability Timing and Surge Management
Hold global powers, such as Soul Impact or your hero ultimate, until waves fully converge inside the central intersection. Firing high-impact area-of-effect spells when armored brawlers and support runners bunch up together maximizes damage value, generates rapid gold returns, and immediately reduces pressure on your garrison. If a lane breaks unexpectedly, prioritize immediate crowd-control abilities to stall leakers while your barracks units respawn.
Free Kingdom Rush Vengeance TD+ Codes
Current active codes and how to redeem them.

Emily Johnson
Emily writes practical mobile strategy guides with a focus on resource planning, base progression, and the early decisions that shape a long-term account.
COMMUNITY
Player Comments
149 players commented on this guide.
Good guide for Kingdom Rush Vengeance TD+ players. The strategy part was useful.
I tried this today and it worked better than my old setup.
Can you add more details about strategy in a future update?
The tips are practical and easy to follow.