
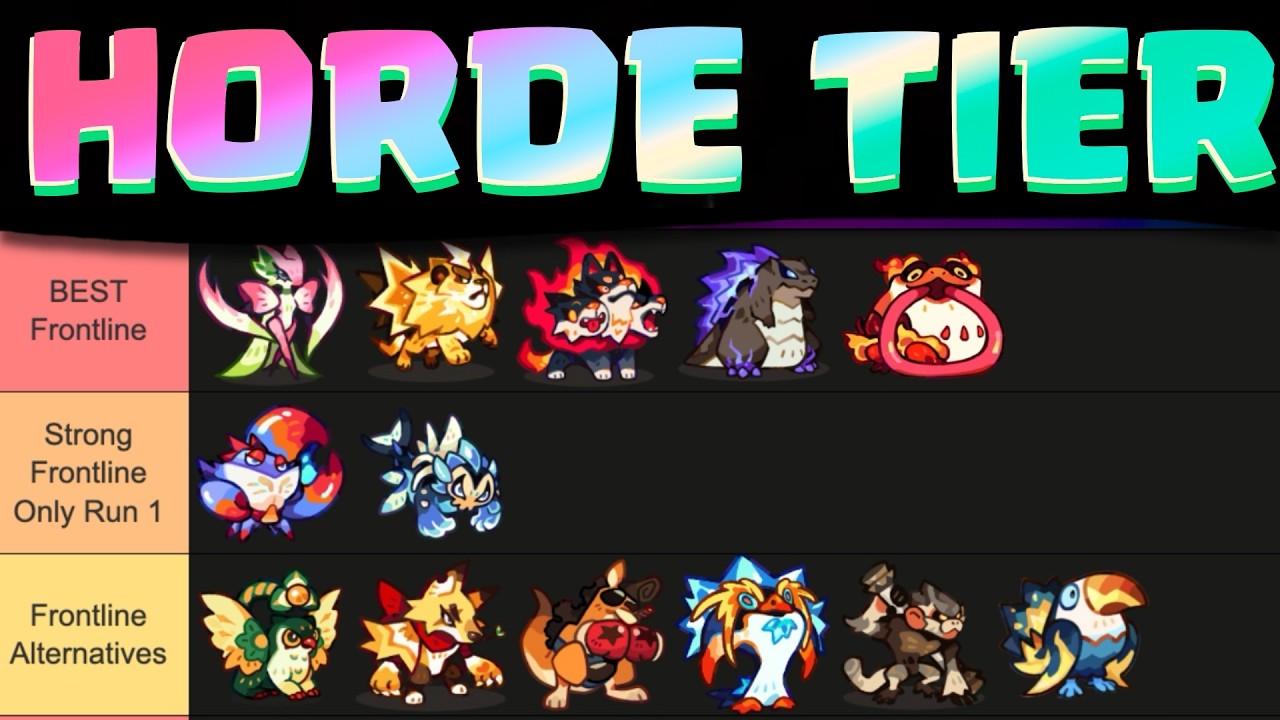

To excel in the Horde Invasion mode of Clash of Critters, players must transition from generalist squads to specialized units capable of handling high-density enemy waves. This guide details the current meta-tier rankings, focusing on the specific Critter abilities that provide the most value during late-wave survival. By aligning your roster with these top-tier choices, you can effectively mitigate the scaling difficulty of the invasion and ensure consistent progress through the highest tiers of the mode.
Understanding the Horde Invasion Meta
Success in Horde Invasion relies on crowd control (CC) and burst Area of Effect (AoE) damage. Unlike standard combat modes where single-target DPS reigns supreme, Horde Invasion rewards players who can manage the "density threshold"—the point at which the number of zombies on screen exceeds your team's ability to kill them before they reach your defensive line.
The game’s difficulty scales exponentially. Players often hit a wall around wave 20, where enemy health pools increase significantly. Success here is not about raw power alone; it is about "efficiency per projectile." Because Clash of Critters utilizes a pinball-style mechanic, your goal is to ensure that every shot or ability activation hits the maximum possible number of targets.
Top-Tier Critters for Invasion Efficiency
The following Critters are currently dominating the meta due to their unique kits that provide sustained control and high-volume damage.
S-Tier: The Crowd Controllers
- Tatari Snowcub: The undisputed king of Horde Invasion. Its ability to freeze and group enemies into a tight cluster allows your other units to land high-damage abilities on multiple targets simultaneously.
- Void Weaver: Provides an essential "slow" debuff that scales with your wave count. It is mandatory for late-game survival, as it buys you the seconds needed for ability cooldowns to reset.
A-Tier: The Burst Specialists
- Inferno Drake: Essential for thinning the horde. Its passive burn effect ignores armor, which is crucial when facing the tougher "tank" zombies that appear in later waves.
- Spark-Tail Fox: Offers high-frequency, rapid-fire attacks. While individual hits are lower, the sheer number of hits makes it the best unit for proccing item-based secondary effects.
B-Tier and Below
Avoid heavy investment in units that rely on single-target stealth or backstab mechanics. In Horde Invasion, these units are effectively useless because they cannot clear the "trash" mobs fast enough to reach the high-priority targets.
Strategic Team Composition and Synergy
Constructing a team for Horde Invasion is about building a "Kill Zone." Your squad should follow the 1-2-2 Rule:
- One Lead Controller: A unit like the Tatari Snowcub that dictates where enemies are positioned.
- Two AoE Burst Dealers: Units that capitalize on the grouping, such as the Inferno Drake.
- Two Utility/Support Units: Units that provide speed buffs or shield resets, ensuring your frontline stays active during massive enemy pressure.
If your team is struggling, check your synergy bonuses. Many Critters provide passive buffs to units of the same element. Prioritizing these elemental synergies often yields higher success rates than simply slotting the highest-level units available.
Managing Resources for Progression
In Clash of Critters, resources are finite. Horde Invasion is your primary engine for farming evolution materials, making it a self-sustaining loop. To optimize this:
- Focus on the Core Three: Do not attempt to level your entire roster. Pick your top three damage dealers and funnel 80% of your resources into them.
- Evolution Priority: Evolve your crowd-control units first. A Level 50 Tatari Snowcub provides more utility than a Level 70 single-target unit because the crowd control keeps the entire field manageable.
- Avoid Experimental Spending: During active invasion events, resist the urge to level new units. Only use established, meta-proven Critters until you have a massive surplus of upgrade materials.
Adapting to Difficulty Spikes
When you hit a "wave wall," do not panic-level your units. Instead, analyze the type of enemy that is ending your run.
- If you are being overwhelmed by speed: You need more slow/freeze utility. Swap a damage dealer for a secondary support unit.
- If enemies have too much health: You are likely lacking "percentage-based" damage. Look for Critters with abilities that deal damage relative to the enemy's maximum health.
Common Mistakes to Avoid
- Ignoring the Pinball Physics: Many players treat the game like a standard RPG. Remember that your Critters' abilities are often tied to how the "ball" hits them. Position your units to ensure the ball path intersects with as many enemies as possible.
- Neglecting Passive Ability Upgrades: Players often focus on active ultimates. However, in late-wave survival, the passive stat boosts (like attack speed or crit chance) are what sustain your DPS when your ultimate is on cooldown.
- Over-relying on Auto-Battle: While convenient, the AI often misses the optimal timing for big AoE abilities. During the final waves, take manual control of your most powerful CC ability to ensure it hits the largest cluster of zombies.
By maintaining a focused roster and prioritizing units that can manipulate enemy positioning, you will consistently clear higher waves and maximize your resource farming in Clash of Critters. Stay patient, focus on your synergy, and let the Snowcub do the heavy lifting.

Sarah Williams
Sarah specializes in RPG and collection games, explaining team building, character growth, and beginner-friendly ways to avoid expensive early mistakes.
COMMUNITY
Player Comments
74 players commented on this guide.
I wish I had read this before upgrading the wrong thing.
The tips are practical and easy to follow.
Good guide for HOT players. The resources part was useful.
I tried this today and it worked better than my old setup.