
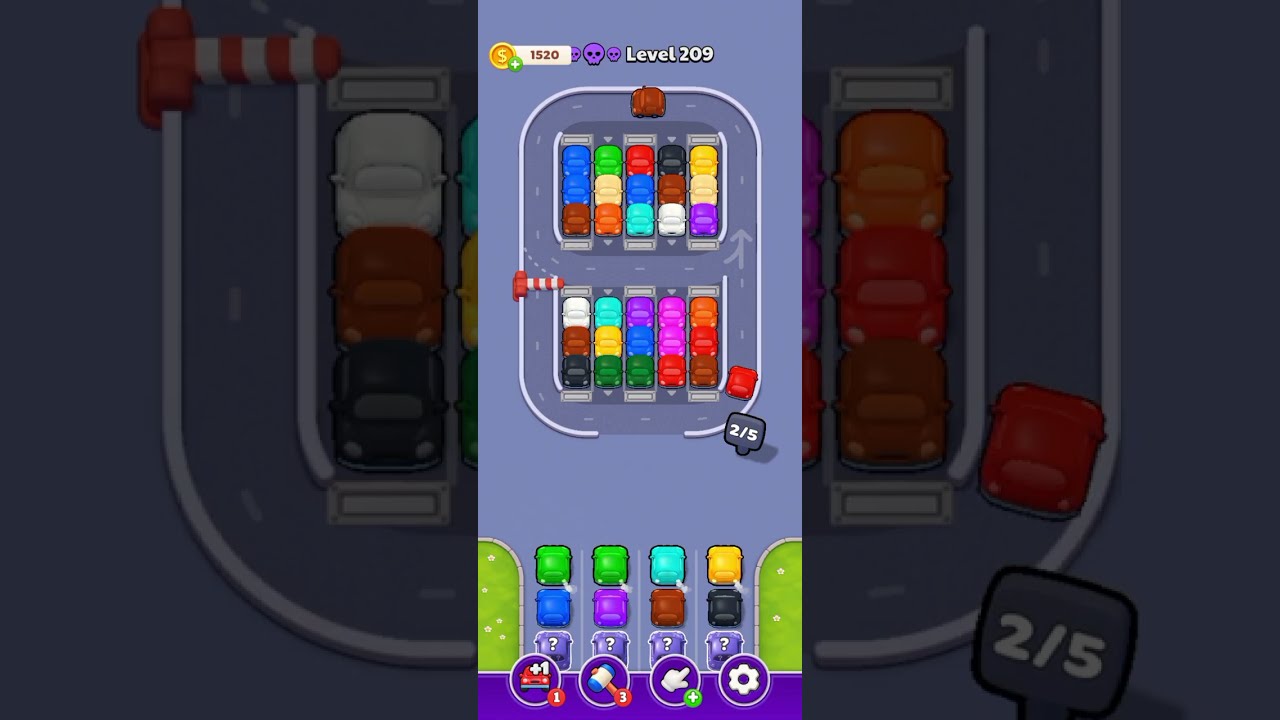
To beat Level 209 in Parking Loop, tap all unobstructed outer perimeter cars immediately at the start of the stage, then release blocked tandem and center vehicles into the trailing gap created behind the initial convoy.
Because vehicles on the circuit never stop moving once released, adding cars without a plan quickly shrinks safe gaps. Managing the board requires clearing stalls in three distinct phases based on vehicle orientation and exit clearance.
Step-by-Step Clearance Order
- Flush the outer perimeter cars first. The loop track begins empty, eliminating collision risk for stalls that face directly into the roadway. Tap every unblocked perimeter vehicle in rapid succession. This bunches the opening wave of cars into a single tight convoy, opening a wide empty gap directly behind the pack.
- Release the front vehicles of tandem bays. Tandem bays feature front vehicles blocking rear cars. Wait for the initial perimeter convoy to pass the tandem exit. As soon as the trailing gap reaches the intersection, tap the front car. Confirm that the front car has completely cleared the bay mouth and merged onto the loop before touching the car behind it.
- Release the rear tandem vehicles. Once the lead car integrates into the active circular flow, wait for the next open gap on the track. Release the trailing car into this gap. Never tap both cars in a tandem pair back-to-back, or the rear car will hit the front bumper or active loop traffic.
- Clear perpendicular center-row stalls last. Center-grid vehicles sit perpendicular to the track and require a wide 90-degree turning radius to enter traffic. This turn makes their merge animation slower than straight-exit perimeter bays. Wait for at least two full vehicle lengths of empty clearance before triggering center-row exits.
Stall Merge Timing and Risk Reference
| Stall Location | Exit Dependency | Collision Risk | Optimal Timing Window |
|---|---|---|---|
| Outer Perimeter | None (direct path) | Very Low | Immediate stage start via rapid taps |
| Tandem Front | None (direct path) | Medium | Primary gap behind the initial perimeter convoy |
| Tandem Rear | Blocked by front car | High | Secondary gap after the front car fully integrates |
| Center Perpendicular | Requires 90-degree turn | Critical | Broad gap of at least two full vehicle lengths |
Chokepoints and Collision Prevention
The two most dangerous collision zones on Level 209 are the upper-right corner merge and the lower-left feeder bottleneck. Prevent blind-spot crashes at these junctions by following these rules:
- Wait for the rear bumper: Do not tap an exiting car while an approaching vehicle is crossing the junction. Commit to the tap only after the passing car's rear bumper has cleared the stall line.
- Avoid simultaneous taps: Releasing two vehicles simultaneously from different angles causes them to converge at corner chokepoints and collide. Release cars one at a time.
- Target the largest gap: Every car added to the loop reduces future gap intervals. If a gap appears too tight for a slow perpendicular turn, let the convoy circulate through another full loop rotation before committing.
Free Parking Loop Codes
Current active codes and how to redeem them.

James Brown
James focuses on Android gaming on PC, emulator setup, controls, performance tuning, and practical troubleshooting for longer play sessions.
COMMUNITY
Player Comments
142 players commented on this guide.
This helped me understand strategy much better.
This saved me time in the early game.
The tips are practical and easy to follow.
The explanation is clear, especially for beginners.