
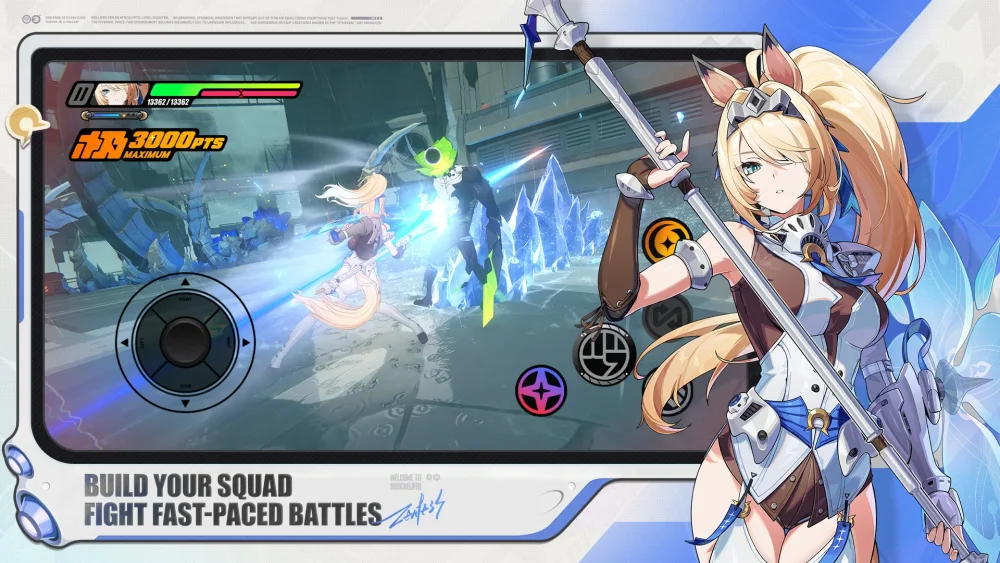
Transitioning from Honkai: Star Rail to Zenless Zone Zero requires replacing turn-based stat checks and queue planning with real-time mechanical execution. Instead of relying on shields to absorb hits during an enemy phase, you must dodge active strikes on visual cue, manage shared team resources, and execute reactive character swaps during fast-paced commissions.
1. Active Dodging and Counters Replace Turn-Based Damage Absorption
In Honkai: Star Rail, survivability depends primarily on passive preparation. Preservation shields, healing over time, and defensive stats mitigate incoming strikes automatically without player intervention once an enemy's turn begins.
In Zenless Zone Zero, defense is entirely real-time and reactive:
- Visual Flash Prompts: Enemies signal incoming attacks with a bright yellow or red gleam.
- Perfect Dodge: Pressing the Dodge key right as the flash appears grants invulnerability frames and briefly slows local time.
- Dodge Counter: Pressing the Basic Attack input immediately after a Perfect Dodge executes a high-impact counterstrike, converting defense directly into offensive pressure.
Failing to react to these visual cues leads to heavy burst damage, as your team cannot rely on passive armor or shields to absorb extended attack strings.
2. On-Field Solo Control and Assist Parries Replace Party Formations
Honkai: Star Rail deploys four active party members simultaneously, with turn order dictated by an Action Value queue and Speed stats. You can plan rotations multiple turns ahead because off-field teammates remain stationed on screen.
Zenless Zone Zero limits active gameplay to a single Agent on the field at any given moment:
- Single-Unit Control: You pilot one character while squadmates remain off-field until called upon.
- Assist Parries: When an enemy initiates an attack marked by a golden gleam, tapping the Switch button triggers a Defensive Assist or Evasive Assist with the incoming Agent.
- Assist Points: Defensive Assists consume Assist Points tracked next to your health bar. If you deplete these points, character switches default to basic swaps without parry frames, leaving the incoming Agent vulnerable to damage.
3. Shared Decibels Replace Individual Ultimate Energy Bars
In Honkai: Star Rail, each character charges an independent Energy bar, allowing squads to queue four consecutive Ultimates across buffers, debuffers, and damage dealers.
Zenless Zone Zero uses a unified Ultimate economy:
- Unified Decibel Gauge: The entire squad shares a single meter that caps at 3,000 Decibels.
- Exclusive Activation: When the gauge reads "EX," pressing the Ultimate input triggers the burst attack of only the currently active Agent, immediately consuming all 3,000 Decibels.
- Operational Priority: Star Rail players must avoid firing Ultimates on instinct. Triggering an Ultimate on a Stun or Support Agent drains the meter completely, starving your primary Attack or Anomaly damage dealer of their main damage window. Always switch to your primary damage dealer before activating an Ultimate.
4. Daze Multipliers and Chain Attacks Replace Toughness Breaks
Depleting an enemy's Toughness bar in Star Rail inflicts Weakness Break, delaying enemy action and applying damage-over-time effects based on elemental affinities and Break Effect stats.
Zenless Zone Zero treats stability breaks as active burst triggers:
- Daze Meter: Enemies feature an orange Daze bar beneath their health gauge. Impact-focused Stun Agents build this meter through basic attacks and EX Special Attacks.
- Stun Multipliers: Reaching 100% Daze immobilizes the target and applies a vulnerability multiplier, typically boosting incoming damage by 150% to 200%.
- Squad Chain Attacks: Landing a heavy attack on a stunned elite or boss triggers a slow-motion Chain Attack prompt. You must tap the left or right prompts to rotate squadmates in sequence, delivering burst damage before the target recovers from the Stun state.
5. Hollow Deep Dive TV Grids Replace 3D Overworld Exploration
Star Rail structures exploration around continuous 3D environments where players trigger pre-combat Techniques, open overworld chests, and ambush wandering enemies to gain immediate combat advantages.
Zenless Zone Zero splits social navigation from commission dungeons:
- Civilian Hubs: Overworld walking is confined to urban districts like Sixth Street and Lumina Square, where you accept quests, purchase food buffs, and manage store activities.
- The HDD System: Hollow combat missions take place inside the Hollow Deep Dive monitor grid. You navigate a board of retro screens using your Bangboo to solve puzzles, collect Resonium buffs, and manage corruption meters.
- Instanced Arenas: Technique buffs do not exist prior to combat. Combat triggers only when stepping onto battle tiles, loading your squad directly into isolated arena encounters.
Summary of Core Mechanical Shifts
| Gameplay Mechanic | Honkai: Star Rail System | Zenless Zone Zero System | Tactical Adjustment Required |
|---|---|---|---|
| Damage Mitigation | Passive shields, taunts, and defensive stats | Real-time evasion and timed invulnerability frames | Dodge on yellow or red enemy gleams; follow with basic attack counters. |
| Squad Deployment | Four units simultaneously active on-field | One active Agent with reactive quick-swaps | Use the switch input during yellow flashes to trigger Defensive Assists. |
| Ultimate Economy | Independent Energy bars per character | Shared squad pool capping at 3,000 Decibels | Switch to your main DPS Agent before activating the Ultimate. |
| Enemy Stagger | Toughness Break with action delay and DoTs | 100% Daze meter causing Stun damage multipliers | Build Daze with Stunners, then cycle teammates via Chain Attack prompts. |
| Commission Routing | 3D overworld roaming with pre-fight Techniques | Bangboo navigation on the HDD monitor grid | Plan movement across TV tiles; combat begins inside instanced arenas. |

Free Zenless Zone Zero Codes
Current active codes and how to redeem them.

Emily Johnson
Emily writes practical mobile strategy guides with a focus on resource planning, base progression, and the early decisions that shape a long-term account.
COMMUNITY
Player Comments
86 players commented on this guide.
Can you add more details about strategy in a future update?
The explanation is clear, especially for beginners.
This saved me time in the early game.
I tried this today and it worked better than my old setup.