
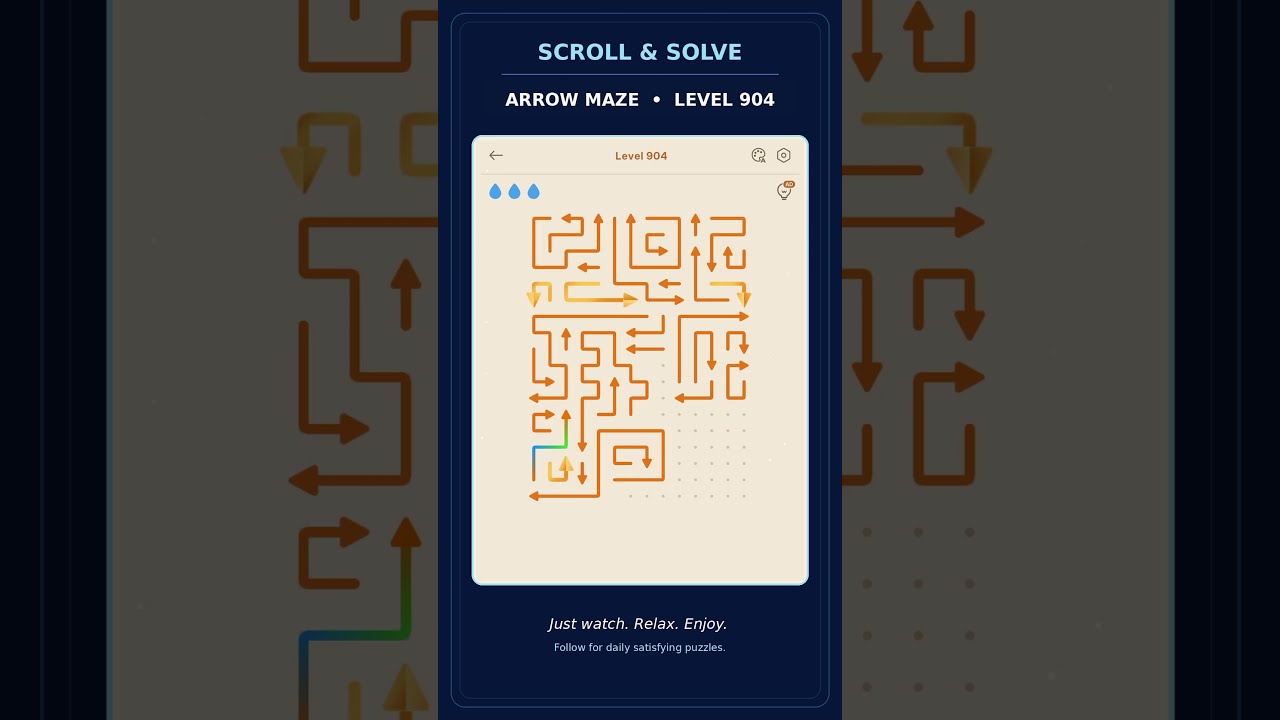
To clear Level 904 in Amaze GO! without collisions, dismantle the board strictly from the outside inward. The primary bottleneck is an interlocking central core whose exit paths are blocked by surrounding tiles. Releasing center arrows prematurely triggers immediate collisions against perimeter blockers. You must scan the outer borders, release unobstructed exterior tiles first, peel away newly freed corner anchors, and then clear the central cluster through the opened corridors.
Outer Perimeter and Corner Clearing Sequence
The initial phase requires locating tiles along the exterior edges that point directly outward into empty space. These arrows have zero obstacles in their line of flight and serve as unconditional movers. Tapping them clears border space and converts blocked lanes into open corridors for the secondary ring.
Once the outward-facing perimeter tiles exit, perpendicular corner arrows become unlocked. In these junctions, one arrow was previously trapped by a perimeter tile crossing its exit lane. After the outer tile clears, the adjacent anchor gains an unobstructed path.
| Clearing Stage | Target Arrow Type | Obstruction Condition | Board State Impact |
|---|---|---|---|
| Initial Sweep | Outward-facing perimeter tiles | Zero obstacles in direct line of flight | Opens initial edge channels |
| Corner Release | Perpendicular junction arrows | Blocked solely by perimeter sweep tiles | Unlocks corner turnarounds |
| Mid-Ring Peeling | Secondary ring directional tiles | Blocked by removed edge and corner pieces | Exposes the dense core hub |
| Central Collapse | Deep central cross arrows | Blocked by inner ring tiles | Clears the board completely |
Central Cluster Domino Sequence
After the outer two rings are stripped away, the puzzle transitions into a compact central formation. Arrows in this hub point across adjacent or shared lanes, creating high-risk collision points if tapped out of order.
- Trace from open exits backward: Do not look for an arrow you want to move. Instead, look at the completely opened lanes exiting the board and trace backward to locate the central arrow that has direct, unblocked access to that lane.
- Tap the lead arrow first: Release the forward-most arrow aligned with the clear corridor.
- Trigger the queue behind it: Immediately tap the arrow waiting directly behind the departed tile, treating each column or row as a linear exit queue.
- Repeat for opposing axes: As one lane empties, cross-axial arrows that were waiting on that space become free to exit.
Collision Avoidance and Path Verification
Misjudging an exit channel by half a tile causes an instant collision. Use these verification checks before tapping any tile:
- Apply the Tip-to-Tail Rule: Check the exact tip of the target arrow and confirm that no adjacent tile's tail or side profile enters its flight corridor.
- Check parallel channels independently: Never assume two adjacent parallel arrows can move together. Ensure each arrow's line of sight to the screen boundary is completely clear before interacting with it.
- Re-scan corners when stalled: If no central arrow appears to have an open exit, pause and inspect the corners. Removing an outer piece often opens a single-tile escape path that is easy to overlook.
Free Amaze GO! Codes
Current active codes and how to redeem them.

Sarah Williams
Sarah specializes in RPG and collection games, explaining team building, character growth, and beginner-friendly ways to avoid expensive early mistakes.
COMMUNITY
Player Comments
75 players commented on this guide.
This saved me time in the early game.
This helped me understand strategy much better.
This guide answered the exact question I had.
Can you add more details about strategy in a future update?