
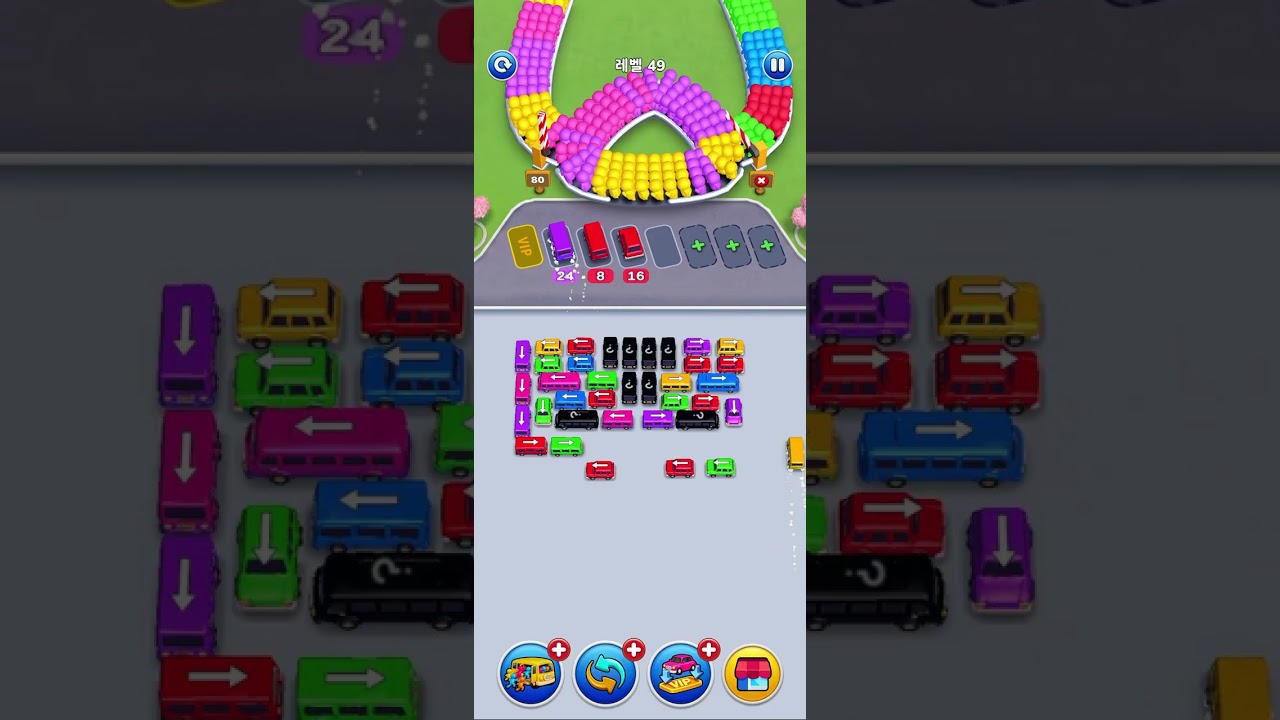
To beat Level 49 in Bus Traffic Fever!, synchronize every vehicle exit directly with the colors at the front of the passenger queue and keep at least one dock bay open at all times. Dispatching vehicles simply because they have an unobstructed exit path clogs the boarding dock with idle units, creating an unrecoverable gridlock.
Clearing Priorities and Board Mechanics
Level 49 traps deep interior columns behind horizontal and vertical cross-blockers. Because the passenger queue resolves strictly in a first-in, first-out sequence, an idle bus sitting at the dock will not board passengers until the line reaches its specific color.
| Vehicle Type | Grid Position | Clearance Priority | Queue Condition |
|---|---|---|---|
| Perimeter Sedans | Outer flanks | High (Early phase) | Must match current front passengers |
| Horizontal Blockers | Center lanes | Medium (Mid phase) | Move only if at least two dock bays are open |
| Interior Buses | Deep center | Low (Late phase) | Move only when exit lanes and matching queue lines align |
Step-by-Step Clearing Sequence
Follow a phased approach to steadily open interior lanes without exhausting dock capacity:
- Clear accessible outer flank matches: Check the front of the passenger line, locate matching vehicles along the unobstructed perimeter, and dispatch them first. Because they board passengers immediately, they vacate their dock slots within seconds.
- Dislodge central cross-blockers: Once perimeter slots are open, target the horizontal vehicles blocking the center. If a blocker matches the next passenger wave, dispatch it immediately. If it does not match, leave it in place until you have at least two empty dock bays and moving it immediately frees a vehicle that matches the front queue.
- Empty high-capacity interior buses: Guide deep interior buses out one at a time. Because these vehicles require larger groups of matching passengers to fill and depart, confirm the line contains enough matching passengers before sending them to the dock.
- Sweep remaining corner units: Clear any leftover edge vehicles to finish the level once the high-capacity central traffic is resolved.
Managing Dock Sacrifices and Near-Failures
Parking a non-matching vehicle in a dock bay is a staging sacrifice that should only be used to unlock transit paths.
- The two-bay rule: Never sacrifice your final remaining open dock bay. If only one bay is open, parking an idle vehicle locks your dock and causes an immediate failure. You must have at least two empty bays before moving an idle blocker out of the way.
- Recovering from an impending jam: If the dock is down to its last open bay and progress stalls, stop tapping immediately. Scan the next three passenger groups in line, then locate an accessible vehicle in the lot matching the very front group. Dispatching that single vehicle boards the front passengers, advances the line, and triggers boarding for the idle vehicles already stranded at your dock.
Free Bus Traffic Fever! Codes
Current active codes and how to redeem them.

Michael Smith
Michael covers live-service games, events, reward systems, and efficient daily routines, turning frequent updates into clear actions for players.
COMMUNITY
Player Comments
99 players commented on this guide.
Nice guide. I am checking the other Bus Traffic Fever! articles next.
The explanation is clear, especially for beginners.
This guide answered the exact question I had.
Good guide for Bus Traffic Fever! players. The updates part was useful.