
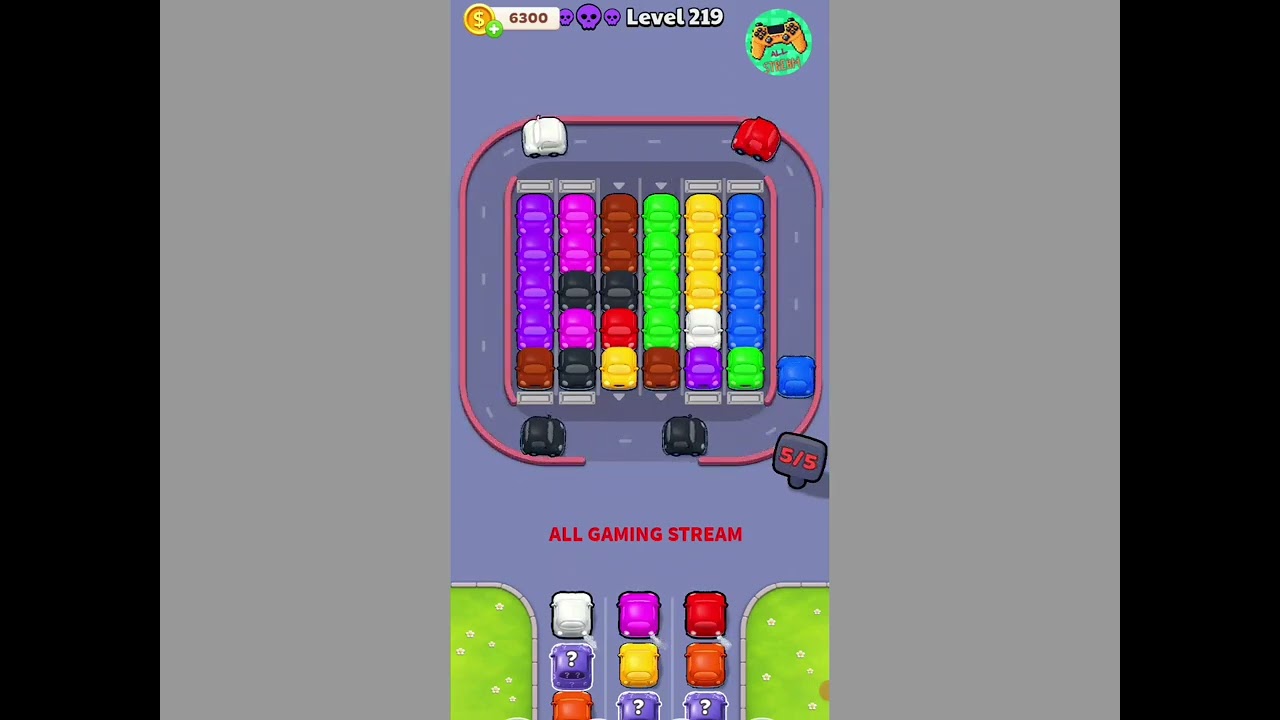
To clear Level 219 in Parking Loop without crashing, release unobstructed perimeter cars first to open exit paths, merge vehicles immediately behind passing loop traffic, and alternate releases across different sides of the lot. Central vehicles cannot exit until forward barrier stalls are empty, making an outside-in clearance sequence mandatory.
Clearance Sequence and Phasing
Level 219 features perpendicular parking rows feeding directly into an active, continuous outer loop. Tapping interior cars while their lane paths are obstructed causes an invalid move. Work through the lot in four distinct phases:
| Clearance Phase | Target Stalls | Tactical Objective | Critical Risk |
|---|---|---|---|
| Phase 1: Perimeter Stripping | Unobstructed outer bays | Clear unobstructed cars to open sightlines | Merging while circulating traffic crosses the apron |
| Phase 2: Blocker Evacuation | Front-row barrier stalls | Open exit lanes for boxed-in center cars | Launching adjacent cars into the same track opening |
| Phase 3: Core Extraction | Queued center columns | Empty interior vehicles into open loop intervals | Misjudging acceleration delay from deep stalls |
| Phase 4: Final Clean-up | Remaining corner stalls | Clear leftover vehicles across wide gaps | Rushing final taps and causing rear-end crashes |
- Strip the outer perimeter: Dispatch exterior cars that face the roadway with no blockers. This clears dead parking space and provides an unobstructed view of loop traffic.
- Evacuate front blockers: Release the barrier vehicles sitting at the heads of the center rows. Clearing these stalls is the critical milestone that turns locked interior columns into active exit lanes.
- Empty the center columns: Release back-row cars one at a time. Always wait until the leading vehicle clears its stall and enters the loop before launching the vehicle directly behind it.
- Clear corner stalls: Finish the remaining corner vehicles during wide traffic intervals.
Merge Timing and Loop Spacing
Exiting vehicles start from a dead stop and experience acceleration delay before reaching track speed. Trying to merge ahead of an approaching car is the most frequent cause of failure on this level.
- Anchor your tap to rear bumpers: Launch your parked car the instant the rear bumper of a circulating car crosses the stall mouth apron. This places your car directly behind the lead vehicle with safe follow-up spacing.
- Alternate release sectors: Avoid releasing vehicles consecutively from neighboring stalls in the same row. Dispatch a car from an upper bay, allow it to join the traffic flow, and then dispatch a car from the opposite or lower sector. This spaces out merging traffic and prevents entry bottlenecks.
Failure Points to Avoid
- Double-tapping opened lanes: After a blocker car pulls out, do not immediately tap the trailing car. If the trailing car accelerates before the front car finishes turning onto the circuit, it will trigger a rear-end collision.
- Ignoring loop density: Every car added to the loop reduces the size of available traffic gaps. If the circuit becomes heavily congested, wait a full loop cycle for cars to space out before dispatching the next vehicle.
- Corner bay turn arcs: Corner stalls feature tighter turning radiuses than straight center stalls. Allow a wider clearance window before releasing corner cars to prevent side-panel impacts.
Free Parking Loop Codes
Current active codes and how to redeem them.

Sarah Williams
Sarah specializes in RPG and collection games, explaining team building, character growth, and beginner-friendly ways to avoid expensive early mistakes.
COMMUNITY
Player Comments
53 players commented on this guide.
This helped me understand strategy much better.
This saved me time in the early game.
Nice guide. I am checking the other Parking Loop articles next.
This guide answered the exact question I had.